Monday, January 16, 2012

DVD Organization

So one of my goals every paycheck it to do some sort of organizing task when it requires buying something.  This weekend, I tackled my DVDs.  I have quite a few DVDs, especially as I own the complete series of Dr. Quinn, Medicine Woman.  I have only one mini closet in my whole house, and my DVDs were stuck into one part of the cabinet.  I needed something more organized, more efficient, and more compact.  The solution I came up with?  A photo box.


So all the DVDs took up a lot of space.  I managed to take a photo of all the cases in a oversize laundry basket to show you how much space they took...


Using DVD sleeves from Dollarama, that cost $1.00 for 25, I placed all the discs into the sleeves and then placed them all in alphabetical order into a photobox from Michaels (a $2 purchase), which when put together looked like this:


Now you may wonder what I'm going to do with all my actual DVD cases.  I'm going to pack them up and put them in storage in the basement.  I don't have much stored down there and in case I decide to sell any or give any away, I just have to go and get the case to match the DVD.  So, all in all, this project cost me less than 10 bucks...Sweet eh?

Saturday, January 7, 2012

Organizing Your Electronic Cords

So I don't know about you, but in this day of electronics, I seem to have more cords than I know what to do with.  I'm leery to throw many out as I might need it when I learn how to work something recently purchased.  Many photos and ideas I've seen have suggested using toilet paper roll holders but I found they weren't big enough...


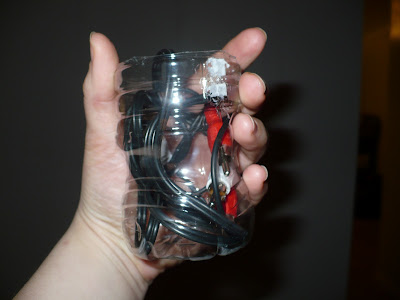
Yup, it just didn't work for me.  But I rolled with the same idea as the concept was excellent.  Taking a box that was used to store frozen fruit and small water bottles, I cut the water bottles down in size to just under the height of my box.  Simple and easy.  The water bottles were wide enough to hold the majority of cords comfortably without anything spilling out overtop.  

Check it out:


I love that they're organized, easy to see, and that they fit comfortably within the bottle (unlike the toilet paper roll).  There are obviously a few thing that don't fit in, that I just tucked at the side as you can see in the 1st picture...

I definitely need to continue this as I do have some more cords!!


Tuesday, December 27, 2011

Hiding an Ugly Closet

I have a very ugly closet, well if you can call it that.  When I moved into my rental house, the men had attempted to make a closet at the front door.  Made of paneling, it had a shelf above the rod which was placed higher than the top of the cut for the door, making one shelf unusable.  The other main problem was that the width of the "doorway" was so narrow, you couldn't actually put any shelving units in there...

As I don't have a proper closet in my bedroom, I decided to put my pants and skirts in there, and well, the bottom of the closet kind of got used as a dumping ground, which you'll see from this picture...


Yup, I know this closet needs to be organized....most of it is shoes, but there are some pillows, and one dog bowl....

So I decided a while ago that I wanted to make a fabric curtain to disguise it.  With Christmas money, I purchased a curtain rod for around $16 and although I had been planning to buy a bed sheet, the fabric cost as much as the bedsheet, coming in at $17 from Fabricland.  It took maybe an hour to make the curtain and then another 45 minutes or so to get up the curtain rod, but this is what it looked like:


Now I did underestimate the length, so I think the next time I can get to the fabric store, I'll pick up some fabric or trim to make a border at the bottom...I loved the fabric so much and here's a close up of the fabric so you can really appreciate it!!


So all in all, the project cost about $40, and I'm really happy with it.  I definitely need some art above the curtain rod, but that will come in time.  I'm on the way to a more polished living room!

Wednesday, November 30, 2011

Melted Snowman Cookies

So I found an adorable picture that I fell in love with on Pinterest.  The picture connected to the blog, Crazy Domestic Blog.


Cute eh?  Well, I decided to tackle this project for a fundraiser my class was doing to raise money to have the Little People of Manitoba out at our school.  I didn't find the tutorial very helpful though as it used all premade store bought ingredients.  I like homemade and wanted to do it in a way that was most cost effective.

Initially I tried one recipe that was deemed to be one of the best on the web.  It wasn't a cheap recipe either-it had a whole pound of butter and although I cubed it and left it out overnight, the recipe was hard to manipulate.  Even after refrigerating, in order to make a cookie, I had to massage each individual ball in my hands.  I wasn't impressed.  I made it work as I didn't like to waste money or time, but I decided to try a different recipe to hopefully get better results...and it was way better!!


First recipe:
(sorry for the quality of pictures as I am still without a camera so I have to use my cell)


Second recipe:  look at how much puffier they are!


First of all,  you need time to make these cookies...expect to spend a whole afternoon and then some with refrigerating, baking, and decorating.

Melted Snowman Cookie Batter

3 cups flour
1 tsp baking powder
1/2 tsp salt
1 cup softened margarine
1 1/4 cups white sugar
3 eggs
1 tsp vanilla
1/2 tsp almond extract

In a large bowl, cream sugar and margarine until light and fluffy.  Beat in eggs, vanilla, and almond extract. 


In a separate bowl, combine your dry ingredients until mixed.  Gradually spoon the flour mixture into the creamed mixture, mixing well after each addition.  


Chill dough about 3 hours.  

Preheat oven to 350 F.  Form balls somewhere around 2 inches.  Flatten in hand so cookie is about the size of your palm (don't do this on your baking sheet as I found it really stuck to the cookie sheet).  Place on stoneware pan.  


Bake until edges are slightly golden brown; for me with my stoneware, I probably baked them for around 17 minutes and got six cookies on one sheet.  Let cool.

15 Cookies

Melted Snowmen Decorations Needed

  • Icing ( I had bought packages after trying to make a runny icing that looked similar to the original picture that didn't turn out.  I ended up having to make some of my own and I think I had a couple cups of icing sugar to 1/8 of a cup of margarine and 1 tbsp of hot water.  You need to plan on making lots of icing!
  • Marshmallows
  • Non stick cooking spray
  • Small tip decorating tubes of various colors (you definitely need black, orange, red, and green)
    • Just some additional information about this; I used three different types based on what I had and what I know I needed.  The brands I used were the Cake Mate Scribblers (usually sold in any grocery store in a pack of green, red, blue, and yellow), Wilton Sparkle Gel in orange (bought from Michaels), and Duff Matte Candy Writer in black and red (bought from Michaels).  I thought the Wilton was easiest to write with, the Duff tubes needed the most preparation (needed to be kept in hot water to get them pliable), while the Cake Mate Scribblers had the best small tip.  However in the end, I actually liked the Duff Candy Writer better because it dried so quickly-no chance of smearing!
Best Tips!

Easiest tube to Squeeze!

Quickest to dry and set!


Steps:

Personally, I like to do things in step and work on the same detail rather than skipping all over the place.  This is your choice though.

Generously place icing on top of cookie.  You want it thick and don't worry if it's not perfect looking cause it's a melted snowman.  Weirder shape the better!


Next, spray a plate generously with non stick cooking spray.  Place marshmallows on plate and microwave up to 30 seconds.  Watch these.  You simply want them to warm and melt slightly, not double in size. Time varies based on how many you're microwaving at a time.  Place on cookie, pressing down slightly.


Add noses, eyes, mouth, buttons, and hands if desired using decorating tubes.  

My finished product looked like this:


They were a huge hit the school...the kids loved them and the adults were impressed...I was happy.

Wednesday, November 23, 2011

Grey Cup Winner

Okay, so this weekend is the big one....my Blue Bombers are going against someone else...don't know who, but I know it's a big weekend for lots...I love football live, but not so much on tv...however, I happened to score big time for this year's Grey Cup....I won a hamper!

Our Coop often has draws for various things.  I don't really pay attention, I just sign the slip and put my phone number on it.  Yesterday though, I happened to go in as I needed to use up the last of my money for breakfast program and I saw my name on the wall.  It announced that I had won the Grey Cup hamper!!  Well, I am not usually a winner, so I was shocked.  I didn't get to pick it up until tonight, and honestly, I hit the jackpot.  The amount of things I got probably totalled over $100 from my coop...

So here's what I got:

  • 1 case Diet Pepsi
  • 1 case Pepsi
  • 1 case 7-Up
  • 24 pack Crush Soda
  • 6 bags of chips
  • 1-50 pack styrofoam plates
  • 3-1 L orange juice
  • 1 box of oranges
  • 1 bag of peanuts
  • 1 mixed container of nuts and chocolate
  • 1 pack of forks
  • 40 plastic cups
  • 1-250 pack of napkins
  • 2 boxes of wings
  • 22 pizza pops
  • 2 boxes of crackers
  • 2 bottles tomato clam juice
  • 1 container hot chocolate mix
  • 1 jar of pickles
  • 2 ham sausage rings
  • 1 roll pepperoni
  • 1 roll salami
  • 1 huge block cheese
  • 1 onion soup mix
  • 1 sour cream container
I feel extremely blessed to have won but in all honesty, I don't need this much food.  I already gave away the case of Diet Pepsi as I gave up diet drinks altogether, and honestly, a lot of it I plan on taking to school and using for the kids Christmas party and as part of the kids breakfast program that I run.  Here's a few pictures of a bit of the stuff....


Back From a Hiatus

So I had a break but now I'm back!  While things have been crazy on my end, I think maybe I've finally gotten used to the craziness...not sure how, but I feel like I'm handling things better...

One thing on my mind lately has been Christmas, as I'm sure it's been on yours...watch for things to come!!


Tuesday, November 1, 2011

Halloween Candy-Cheap or Not?

So I don't know about you, but I find the price of candy is dramatically going up.  It's expensive!  For me, on one hand, I want the good stuff, but I'm just about choking when I have to go and pay for it.

My biggest struggle came in not knowing how much I needed to buy as I was in a new town.  I found out on Halloween day that I should expect anywhere from 150-175.  I was shocked!  I'd only ever had like 50 kids at the most!

I was able to get all my candy on sale, so that definitely helped.  My first box was a bunch of mini chocolate bars (92 count for $10, regular $17 at Canadian Tire), but then I ate some.  So when I went to the city, I knew that I should have more just in case (where I live is near the reserve I work at and I expected a lot of kids from there). This was where I got a good deal at.....Winners!  All their Halloween supplies were 70% off.  I got 2 bags of gummies (88 count each for less than $3 each).  Not bad eh?  Gummies aren't my favorite thing to hand out, but it did the trick.  I already have my next store picked out for when I need to buy my Halloween candy-the grocery store on the reserve.  They were selling boxes of 63 count brand name chips for only 10 bucks (and no taxes of course).  Everything in the city was like 30 bags for $10.  That's definitely a deal that I am taking up next year!

(pictures to come later-gotta figure out how to hook up my old camera to this new laptop-it doesn't have a spot for my card to automatically go in....)